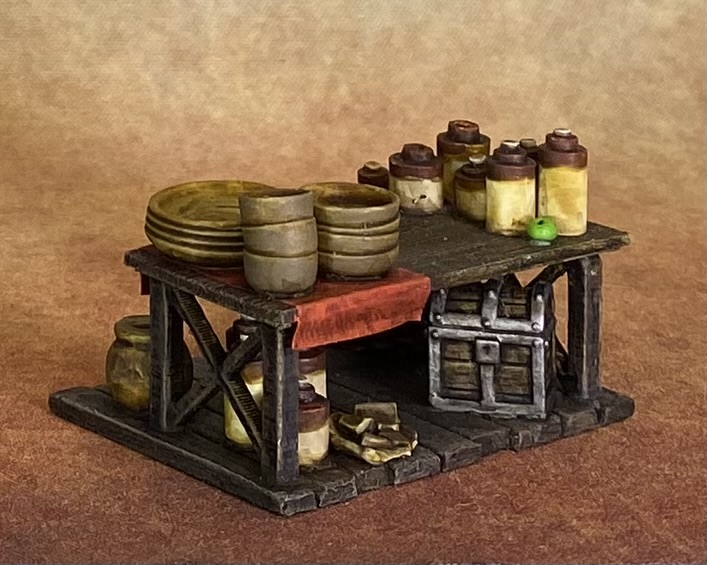
Sunday, 19 February 2012

old timber frame cottage part 1

progress on the lasercut cottage kit... it hasn't actually taken me 10 days to get to this stage, I'm just a very occassional worker at the moment...

balsa wood has been added to follow the frames cut into the mdf... I still need to do the curved braces and the undereave timbers, but the majority is done and I wanted to get an update sorted out... annoyingly I bought a shedload of 2mm balsa a while ago and so went with that for the timber, but it was too thick so when it was on, the whole face was sanded back to a rough and varied 1mm... the slight differences add to the feel I think, although some horrendous over pressure (mainly on the gables) meant g/s had to rebuild the timber in a few spots - I have to say Silent Invader's work over on LAF and his own blog are very handy references for this kind of work... also I'm becoming a huge fan of GW Liquid Greenstuff, when dry it's hard, but is just soft enough to allow a wire brush to add some woodgrain...

I gave the whole balsa frame a good going over with the wirebrush to get some more grain into the sanded flat surface, varying direction with the length of the timber... windowsills were added with matchsticks, cut into the existing balsa frames, but standing proud of the frame itself..

the basic kit didn't come with the floorboards cut in as I said before and this is something of a blessing as the mdf surface is too smooth to get a wood effect with and when 'roughed' up just gets down to the fibrous mess inside which is no better... I bought the thinnest balsa I could find and glued that to the interior floors and scored in the floorboards - each is 5mm wide which may seem wide in the grand scheme of things, but gives me 17 boards across, when the lasercut version has 16 across... I also cut the hatch over to one corner (from the look of the instruction diagram, on the bought kit that is in the middle of the floor), it's 2cm square, wide enough for the ladder and a 28mm body, leaving the majority of the floor clear - what I loved about this kit is the access to the inside and I want to make the most of it... I added a frame around the hatch into the balsa, with a little help from more liquid g/s...

same with the downstairs floor really, although no hatch... the ladder will be attached to the downstairs wall once it's prepped and I have a rather nice fireplace made up - it just didn't photograph well... I need to do the matching breast upstairs, but it will be on a small footprint so I don't lose any floor... the one difference with this floor was that I needed the balsa to be flush with the bottom of the doorframe, so the walls are all raised slightly by the same thickness of balsa, this is hidden by the framing timbers though, but just thought I mention it if anyone is following in these footsteps...

and a shot for scale... poor photos I know, but they do the job... I need to add the curved timbers on the frame, the chimney breast on the first floor and decide what to do about the roof before adding the chimney stack itself... that will probably be made from blue insulation foam rather than using the mdf one in the kit... similarly to the floorboard problem, the door from the accessories kit is going to be too smooth, so I need to think on that... I still think that kit is a good deal, the windows alone make it, and the lovely little tudor door frame detail as well... I'll keep you posted on that...

Thursday, 9 February 2012

burn burn burn...

ah, the smell of burning wood... and not a witch in sight - not that burning was a legal punishment for witchcraft, that was reserved for treason (been doing a lot of reading)...

through a random sequence of events that escapes me, I found this company: 4ground

a new company to me... they are behind the lasercut Rourke's Drift that Warlord have recently bundled up with stuff, but I can't say as I'd gone looking for who did the buildings at the time - but the timber framed building caught my eye...

(I nicked the pic from their website, mine will be in bits for a while as I'm away the weekend)

I ordered the basic detail kit for £5.50 and a Tudor tarting up kit (doors and windows), the plan being to get a bit more depth with it using balsa or matchsticks for the framing... it's a very nice little kit on 3 A5 sheets of mdf or whatever, has popped out very nicely and is a good snug dry fit...

now, the basic kit I ordered does not have the floorboards on the floors or the ladder hatch on the first floor which is visible on some of the painted examples - but as it's on the instruction sheet I must assume is part of the more detailed version, so before I glue I need to score some detail there and cut the hatch... this is a pain, however on the plus side it does mean the hatch will be where I want and not too far into the middle of the room...

also there is no footprint to slip the first floor section into the ground floor walls - it sits loose, however, I think that extended beams in the detail kit I ordered will fill this function.... however I need to consider the thickness of the balsa I dress the thing with when this comes into play so I may need to make my own...

the detail kit is very nice and I would recommend that alone to people doing their own buildings, the door and frame should look nice and the windows will look very effective in place...

of course none of this involves the ghouls which defy painting and stare out at me from my desk on a daily basis, the children and elders of Angel Blake's gang which are also defying the brush, the 80's SAS which I've started making and the secret agent types to go with them...

and if that wasn't annoying enough, I have a landlord inspection tomorrow and my room now stinks of burnt wood...

Monday, 2 January 2012

the Munich Manual of Demonic Magic...

recently on Channel 4, there was a thing on called Gods and Monsters that covered the mythology and folklore of England... the frankly embarrassing to watch bits with Tony Robinson aside, it had some interesting nuggets of information covering fairies, plague and possession and one such nugget was the Munich Manual... a 15th Century grimoire written in Latin that covered Necromancy and Demonology... of course, being written in Latin, it could only really be read and used by the learned of the age and none were more fluent in Latin than the Church...

I had thought of doing something similar with the Warlord's Archbishop Laud figure, dressed as he is in a scholarly fashion, so the Munich Manual fitted in perfectly. I'd actually done the cassocky thing a while back, but had got put off with yet another black and white figure for this and another nudge to get this chap done was when I stumbled across one painted with a purple cassock on the Warlord forums... I don't think I've ever painted anything purple, the 6th Doctor's waistcoat was about it, and it had the bonus of not being black, but still ecumenical or not depending on my mood...

the figure had a hefty integral base which I couldn't be bothered to file down, nor could I be bothered to cut the slotta and sink it down... as the devout trooper started me on the uneven moorland look, I thought that would work quite nicely here and I added a fallen gravestone to the base as something a bit different - disused or abused graveyard just perfect for ghoulish things... the book I painted using leathery flesh tones to give it a Necronomicon feel... oddly, the shading on the black lining looks a bit clumsy in the photos, but isn't in the lead...

annoyingly the grass doesn't seem to work, did everything the same as the others in this range, but it doesn't look right to me... very annoying...

of course, this wasn't anything I had otherwise been working on in December, the purple gown kind of prodded me on with this one... hey ho...

Sunday, 18 December 2011

December is rather running away from me...

and I'm not likely to have anything finished to post up... the ghouls have some paint on them (but not enough) and my first attempt at a fairy ring hasn't quite worked so need to have another bash at that... Angel's gang has slowly been getting some recruits as well, but they need a bit of a g/s session.

It's all very Folk Horror at the moment, especially as I've been given the Lore of the Land as an early Christmas present - lots of bits about English folklore that has given me some ideas... to hell with brooms, I need some hurdles!

Wednesday, 30 November 2011

+++INPUT+++MECHANOIDS+++INPUT+++

some classic Who Mechanoids...

from an admittedly not so random question now I think about it to a 3D print to this, now available from Ainsty as the Mechanot... and it's the same shiny silver problem I had with the Giant Robot, shading and super shiny are beyond me so they have more of a lived in air to them...

I've change a bit from the Ainsty model/original design (which has three sensors in a triangular pattern) - I want to do some identifiers on the front panel, so filled that in with g/s - need to work on those decals at some point... another divergence is the area below the antenna... I did toy with paint in the white balls (or could have done some conversion work to add them in), but decided to inject even the slightest bit of colour in there so tried for a pale blue glow to suggest a power source within...

have also left the bases for now, as I'm entertaining ideas on doing a space station build again... so they could be deck plate or they could be dirt/gravel and grass...

so, pending decals and deciding on the base, done for now...

ECW Ghouls...

have been slowly g/s stuff to get some ECW ghouls from the Warlord placcy stuff and the Mantic placcy Ghouls...

first off Mantic Ghouls with g/s puffy trousers and shredded Llewellyn-Bowen shirts, some of the orginal rags should make for decent enough shredded stockings...

a mix of Mantic and Warlord bits for a more recently departed (or more careful) ghoul... sadly, the Mantic stuff is a little too big for the Warlord plastics, but with the more action poses you can get away with the head and arms ok... I do have some more planned, but the pose means they may have to use the original Warlord head and I'll need to be a bit more creative... but I've g/s'd out at the moment...

and finally, the above, mixed in with some standard fantasy rag Mantic ghouls...