Showing posts with label CD bases. Show all posts

Thursday, 7 December 2023

CD bases

So, November got away from me. Some more Silver Bayonet figures on the horizon, just need to varnish. In the meantime, a recent post on the Silver Bayonet Facebook page reminded me I did a load of CD scatter terrain a while back and never shared it. I’ve added a tag of CD Bases to old posts just to highlight them. These are mainly standard CDs, with the very last of the mini CDs I had stashed.

Rocks are tree bark from Geek Gaming Scenics, with some spiral carved rocks from Fenris Games. A slightly modified (it was a miscast freebie from the ever generous Ian) mausoleum is also from Fenris Games. Other scatter is intended to give a more blasted heath feel, with slight dirt uplifts and broken ground. I cut back on the flowers for those ones. Anyway, photo dump…


Monday, 26 April 2021

Meats back on the menu boys!


A dead cow from Warlord... not much to say about this to be honest. Nice model, done with contrast paints in various layers and blended... mainly Darkoath Flesh, Apothecary White and Gulliman Flesh. Hooves in an off white.


Saturday, 31 October 2020

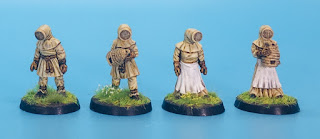
Aghh! Not the bees...!

So, September pretty much disappeared - I’d been retiling the Manor House for a better finish which wasn’t very exciting and ended up being redone again anyway. Plus the whole pandemic, redundancy, lack of jobs and stress didn’t help much. October nearly escaped me, but did manage to get these guys finished - medieval bee keepers and hives from Midlam Miniatures (they do some halfling ones as well).

Mix of male and female, lovely minis - possibly a little to early for the 17th century, but beggars can’t be choosers and I doubt bee keeping technology advanced that much (the alternative is modern square hives). Besides, if it’s creepy enough for Nicholas Cage...


Saturday, 19 April 2014

wood for the trees and other vistas


ok, excuse the poor photos (colours really aren't being done credit), but have finally got stuff to stick to the sodding trees... it looks much more blended in real life, but job done (finally). The big trees sadly just didn't work, tried and tried to get them looking as I intended and just couldn't - so chopped them down and used the bases for thickets (as I was very happy with the bases), these are a good solid line of sight blocker, and will be doing some smaller ones as well to help make a more overgrown woodland-ish look. The new and improved foliage of course meant I needed to redo my bushes, so the hillfort and other bits of undergrowth have been redone to match the thickets, again, photos don't really do it justice... but as I said, more bits are in progress as I've run out of Burnt Umber.


 as the trees were to big to really get in the light tent, the board came out, which then dovetailed into a request someone on Frothers made to see it all, so above is the woodland in progress, with stone circle and hillfort, and below is the coaching inn, the blacksmiths and the two houses...


this has been surprising useful in that it fills the area better than I had thought - I have two more 2-storey houses to build which should about do it, along with some little bits for flavour (a well and some mud/dirt roads/townsquare), plus of course I still want to do a church and graveyard as a 3rd option (none of which yet exists). Also unseen is the river side which would roughly fill the bottom corner area above, and numerous hedges I built ages back when I was working to fill a larger area, plus some drystone walls from Fenris Games.

I know I plod along at this and am easily distracted, but am quite chuffed looking at it how good it's coming together... even if I do say so myself.

Monday, 26 August 2013

can't see the wood for the trees...


Well, the trees were de-sponged and re painted (and in the case of the smaller plain woodland scenics trees replaced), colours in the photo don't quite match for some reason. The bigger trees had additional branches added, so there was quite a bit more to redo on those, they look ok, but I won't know for sure until I come to add the foliage, which I have been trying to do for a couple of days now. On consultation with a few folks, I've tried PVA and Superglue, but not holding at all (apart from a couple of flecks which you may see), but I may need a better application method.

Friday, 31 May 2013

foliage test


ok, following on from the sponge, it's painted dark green (which is not as easy as you'd think), leaf flock on top - needs some touching up, but on the whole it looks good from a distance, but close up, there are spots that just look too much like sponge... I'd hoped the holes would give a more layered feeling to the foliage, some depth, but not 100% it's worked...

may fill some too spongey bits with clump and reflock... or just go all clump...

Friday, 17 May 2013

some Folky WIPs

hadn't forgotten this, just slightly sidelined...

first off, the long planned bit of woodland... even though I have a small area, Silent Invader's excellent FIW woodland on a noticeboard just goes to show what can fit, but I've been a bit more modest - so far...

a test with some sponge... with leaf flock it should look ok I reckon... the sponge is just to give the foliage some body...


and the rest:


I kind of liked the GW plastic trees for their creepiness, so I knew I needed some gnarled big old things and made three using some balsa for the main trunk, lots and lots of wire (god that took a long time) and tissue paper and pva glue... there is some texture in there, it's just hard to see in the pics... as you can see, they are on CD bases, and I may have gone a bit OTT, but go back a couple of hundred years and you should have had some pretty old and big trees out and about... I hope...

and some Woodland Scenics jobbies for some younger growth, this time on minidisc bases, with the join hidden by the same tissue and pva and to help match them up to the larger ones... I have some more of these, but want to see how many I'd really need before I go nuts. The branches on these meant they didn't really look right on CD's, but Silent Invader's ones do continue to inspire...
 

and, for the river section dock, a removable jetty... it slots in perfectly and should give a bit of variety


Saturday, 15 December 2012

away with the Faeries...


right... a larger whole with a couple of small bits... first off, a Fairy Fort - ok, so the term is Irish, but I like it and it fits the job. Bit of a bugger to photograph, but somewhere in there is a corner of a long forgotten Iron Age hill fort, eroded and overgrown and too big to photograph properly sadly...


a simple enough construction, a block of old polystyrene shaped - it started off as a simple hill with smooth sides, but then thought about roughing it up a bit to make it more interesting. This eventually triggered a memory of the Fairy Forts and a few broken rings and ditches were made, with a well worn path to the top.


At the top I've made a round recess to take the old mini-discs I'm using for some basing so I can swap out what is at the summit. First up is a Fairy Ring, a natural circular growth of mushrooms.


I had been meaning to do one of these for a while, but getting the 'shrooms right was a pig as they never had that strong enough a join to the base. I ended up supergluing a ring of really thin plasticard to the disc, and then using poly cement added some plastic rod of varying heights - I had planned on adding discs for the mushroom caps, but then realised they'd be far too big, so just painted the tips of the exposed rods white and darkened down the rod with Devlan Mud. With the static grass added and a few clumps (as the mushrooms usually promote luxuriant grass growth as well), the rod pretty much is hidden and you just see the blobby tops in brilliant white. Job done.

Next up was a suggestion from LAF, a beacon. As they tended to be placed on prominent locations, the top of the fort seemed a good spot, so that was in mind when the hill fort was being built. I picked up a GW Bretonian Archer brazier, cut the top off and added it to a length of brass rod. The ladder was made from plasicard and plastic rod and made as rickety looking as possible. The bucket is from the Redoubt female villager who got turned into a ghoul.


the paintjob was a bit of a problem though. Bare metal didn't look right, so it had to be blackened ironwork - which then posed a problem with the coals in the brazier. I didn't want it lit or glowy and I had considered wood, but the shapes were too irregular. Not 100% with the difference between the coal and the ironwork, but it will do for now. 


of course, by a lucky coincidence, the gibbet is also on an old mini-disc and is also something that would have been placed prominently, so that made another option for the summit.


As I said, hard to photograph, but you get the idea.

Sunday, 28 October 2012

the Nine Sisters

a Salute purchase, a resin stone circle from the Square... on the face of it, a stone circle is easy enough to make yourself, but for £4 it's a hell of a lot less effort...


I added a base to the resin cast, just to help even out a slight kink (hey £4), and to give the entrance to the circle a more gradual slope...


base was textured, painted to match the other groundwork I have... I tend to go grey for stones, but wanted something different here to make it stand out (and many stone circles tended to have travelled some distance), so went with GW Karak Stone, drybrushed with GW whatever it's called now Bone... bit of dark tone wash and job done... grass, grass tufts and then flowers... may be over done for some, but I wanted an effect similar to the Rohirrim burial mounds in Lord of the Rings...


it's a generic, unscaled item on the Square's website, but works well for a small circle in 28mm...

Sunday, 26 August 2012

Mast Beast...

and the Mast Beast is painted...


happy with this one, painted two at once - the one on the d/s base will be destined for the Fenris display case and webstore...


and the resin master - see, a new foot!