Showing posts with label River. Show all posts

Monday, 12 August 2019

Miller Time (new pics)...

[OK, since I moved house, I've not done any photos of stuff and discovered last week that my new place isn't blessed for lighting like my old place was (skylight and sloped white roof to reflect an anglepoise), so treated myself to a new lightbox, with a built in LED strip, nice and bright, but I need to keep tinkering with my camera I think - anyhoo newer better pics below...]

Finally, here is the watermill...


I added a dovecote to the front wall to cover the expanse of wall without any real feature. Quite happy with it, although it's not that clear. I'll have to redo these pics at some point.


The millstones, cogs and bits are all scratchbuilt, the stairs are from Fenris Games.


The grain sacks are from Ainsty Castings Trade Goods range.


And it connects nicely within the existing river sections. The angled corner eliminates an awkward angle that was created by the adjoining river bank section. In fact I managed to match up the new bit to stuff done 4-5 years ago quite nicely even if I say so myself, but then managed to kill everything when I added gloss to all the pieces... so I had to do some remedial work to rescue them. You can see if you really examine it, but for now, it works for me.


Thursday, 11 July 2019

Planning the base...

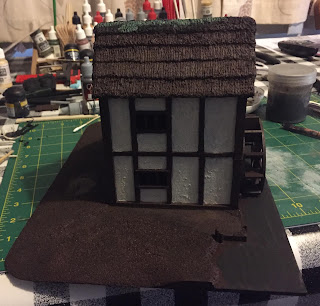
Okeydoke... thatch is done and in various states of touch up, base coat shenanigans. Base is sand done with patches where I want to blend in the Vallejo texture for hard worn paths. A test fit to check everything looks ok and that is s hell of a wall of nothing on the front. Considering a tree...


Saturday, 11 May 2019

Water Mill WIP


OK, so the base to join in with the other river tiles is done. Went through several stages/designs but the main consideration was to avoid making the building look like it cut into the inevitable slope of the river - the slope is a result of placeable river sections and not a incline as far as models are concerned. That resulted in a larger base than originally envisioned, but hey...


I’ve added some texture to the wheel, the plain mdf is serviceable but I’m anal about that kind of thing. This is actually the inner side rather than a before shot as I’m not that organised. Ignore the hole in the middle, that was to allow a plastic tube in for the axel, which is an absent detail from the kit. Also, I was an idiot and built the wheel before thinking about any of this and my efforts then resulted in a broken spoke (hence the white plastic reinforcement).


And the visible side with liquid green stuff added and then scored to give some texture. I made a little irregularly toothed tool to do this and made sure to pick out the existing details of the retaining blocks and so on. Hopefully it will paint up ok. The hub is thin balsa which was hit with a steel brush.


The interior starting mock up. Think this should give the right impression, but I need to make some cogs to transfer the horizontal rotation to the vertical. It’s a basic idea of a mill and not a working model or anything, so gives the right impression I think.


And finally another consideration that I’d not thought of is that a different kit from a different manufacturer means different sized doors. I don’t mind the windows being different, but I do want my doors to be mix and match as needed which means consistency...


Monday, 6 May 2019

diving back in...

So, I’ve been slowly getting a groove on, greenstuffed a load of zombies into the 17th century. I had them kind of half done from a few years back, but finished them off and slapped some paint on them. Not my best, but a) not bad for two plus years absence and 2) I hate doing rank and file and wanted to get them out of the way. Now, my laptop is dead so no fancy pics at the moment as I’m using my phone and no light tent, so a quick “painted something honest” shot below. Basing still to be sorted and will see to doing a photo session later...

Next up then is back to building... saw these online (Blotz.co.uk) and figured a change to the 4ground buildings would be good. The mill is interesting as with my fetish for interiors I’m looking forward to doing some workings in there. 


What is interesting is that the timbers are cut separately and stand proud... normally I’d do that myself with balsa, but may have to see if I can get a rough timber texture on them. The barn is simple enough, an extension floor is available, but I reckon I can do that myself. So far, so good, reckon I won’t go wrong to get a couple more if needed.


Friday, 1 June 2012

skirmish board

for a while now I'd had 4 2ft square foam terrain boards for a nice 4x4ft playing area... sadly following several downsize house moves, I no longer had the space other than the floor - however good luck finding a level surface with these floorboards, the square tiles tended to follow their own inclination and a 2x2ft playing area just didn't really cut it... so I flogged them and bought what appears to have been one of the last Mat-o-War green mats going.... only at 6x4ft it was more than I'd ever need... cue another moment of inspiration from Silent Invader over on LAF and his notice board table (which was reversable)

so with a cheap cork notice board from eBay I set to work... first off, the corner pieces were not solid (I said cheap right?), so they were filled in with g/s and smoothed flat so I had a nice consistant edge - this is going to be stored upright, so the metal edging was essential... the new corners were then painted Foundry black midtone which was a good match for the original plastic and then varnish to an inch of it's life... next came the scary bit... I had planned to cut the Mat-o-War so I had 4x4 as a loose mat and then 2x4 going spare, but this project gave me a use for the 2x4 - it was just the thought of cutting possibly the last mat going was a bit daunting... this could be an expensive screw up... so I chickened out and bought a cheap grassmat from eBay...


this was glued in place, only when I was pressing out any airbubbles, off came the grass (see cheap again), eventually I had a brown board with green patches... not good... so back to plan B and I stripped the cheap paper mat off and cut the expensive Mat-o-War up... once commited it went on quick enough, but again I had a couple of bubbles in the mat despite my best efforts - however the sturdiness of the mat came into it's own as I was able to slice the bubble, insert more glue and press it closed with no sign of the cuts and no sign of the bubble... this was working fine until I had a glue accident and the top surface got a few splodges of UHU which, despite clean up, managed to still leave some dark spots when dry... but a cunning plan occured and with some scenic spray cement I added some static grass - with a very dodgy nozzle, this was more random than I planned and so there is more on there than needed, but it helps give some more colour and texture to the grass and helps match up with the terrain I have... this was kind of at the back of my mind, as I had thought about the exposed earth areas on my terrain and I didn't really fancy doing that to the mat...


so, there it is... a handy skirmish board, a little under 3x2 feet that can sit nicely and flat either on the floor or on my small painting table (when it's clear)... it should be big enough for the small games I have in mind for either Folk Horror or Doctor Who, although some distances may need to be shortened... I just need to finish more scenery - the three river bank sections fit nicely along the long side and by removing the dock area, the two sections fit on the short side... I have some dirt tracks in mind (again nicked from Silent Invader) and this has led me to think about a bridge section as well... we'll see...

oh, and I kept the cork board on the other side - I plan to use that for urban/industrial terrain...