Showing posts with label Doctor Who. Show all posts

Sunday, 7 January 2024

A Doctor

And done… the scarf is a bit wrong, as I followed the pattern from both ends, knowing I wouldn’t meet in middle as I wasn’t doing precise thicknesses, so the left hand end gets repeated a bit behind the neck and a I made a bit in the loop up. But works. I’ve assumed the sculpt is based on The Invasion Of Time, so tried to follow that, but it was the 70’s and everything was brown. Added the little red roses to his waistcoat, but they don’t stand out against the brown. All in all, quite happy with that.

Varnish is annoyingly satin though.


Saturday, 21 October 2023

Sci-fi City Block WIP 5


Some alternate buttress toppers for when the eagles don’t fit the theme. Made from plasticard, foampvc and some spares for the old Palitoy Millennium Falcon that I got cheap. Magnetised as the eagles.

Monday, 25 September 2023

Sci-fi City Block WIP 2


 So… yeah, bigger than planned, but I’m liking it. Feels right. Hope the paint job feels as right. Planning on setting specific magnetised signs and statues to keep it flexible.

Saturday, 19 August 2023

Sci-fi City Block

 Part of my vague Mega-City terrain, a corner piece to represent a cityblock or any building really. Made with a foam base structure, chipboard/cardboard cladding, then thin plasticard on the board to allow panels and greebles… the Maelstrom’s Edge greeble sprue will come in handy. Random unfinished block gang member for scale.


And this will go between them. Bits from a Playmobil airport and foam. It will get the same cladding as above, so hopefully it will all work together. I need more foampvc to do the base before I go any further. 

It’s also much bigger than I anticipated. Could be an issue, but plowing on regardless. If it’s too big to store, watch for eBay… 😂

Tuesday, 25 July 2023

Sci-fi urban tiles

A change of pace, some modular tiles intended for Judge Dredd primarily, but will be pretty generic. Utilising the Kill-Team friendly tiles from Fire Dragon Games. I have a set of four, but space means I can only really work on one at a time.


The tile texture is scribed into foam-pvc in 20mm squares. The big step was cutting the hole in the foam insert, but it’s worked so far. It theoretically will house inserts for an airlock, an industrial grinder, a sump pool and just blank tiles. The odd grey tile is from the Maelstrom’s Edge terrain sprue, which was happily a 20mm square.


Wednesday, 24 September 2014

and I'm back...

OK, after a period of mojo recovery, I've been busy - sadly some of that was a build up, review, tear down kind of busy, but the corrections (note the plural there) were worthwhile.
 

The bridge slots on nicely and will lead to something I haven't come up with yet, I've decided not to use the hexagonal platforms on the corners as they look odd with the rear bits built up, so I've done a simple platform for security, am still working on ideas for the other corner.


I wanted an open area down into the engineeringy section, but that took a couple of attempts until I got something I liked. Even then, it didn't quite work, so I raised it slightly to give the joining bridge more clearance. That was too tall to join with the far build as I planned, so that got lowered. I plan that part to be quite tall, but haven't the foampvc at the moment to complete the walls. I dread to think how much got used on false starts to get cut off again.

Anyway, I didn't take a photo of the interior of the far build, but a recessed door has been built - I'm trying to take a leaf from BBC set design with the doors and split level floors. The recess should also give Vila some cover while he picks the lock. 


Quite a successful change has been the doors - I stumbled upon some hobby sheet aluminium, with a few scores from a scalpel, it's snapped to size and sanded down - it's quite rigid and has a nice finish, although I initially thought metal would be handy as a material if the paint should get worn off from use, it's kind of works as it is.


And that's about it really - am kind of stalled as I need some stairs in order to really advance the builds at this point, but that is in hand.

Wednesday, 9 July 2014

blather

firstly, I have a smart phone - and I'm still finding my way around the damn thing - however, it does appear to be smart enough to automatically include pics in my blog in my gallery and I miss my old wallpapers... so stay with me...


ahem - ok, progress on other things has been really slow, I had some time off work and really intended to get some figures painted, but my mojo has done a Burton and I'm stuck... suspect I will get back to the old toy thing as that is pushing me a bit more, but I am painfully aware of how long it's been since I actually painted anything and am getting a bit worried I might not get back in the swing of things... bloody mojo...

Wednesday, 4 June 2014

old toy new life WIP part 2

well, technically part 2 at any rate, it just needed a catchier title...

Ok, the rooms within the base unit are done, walls thickened up slightly, some card down to hide various out of scale bits removed. All of the walls are at a slight angle, which makes things less boring, but means I have to get the doorways just right - and have just about managed it I think. Computer banks from Ainsty, which fit in quite nicely, the remaining corner will have swappable units I think, so it can vary what research/experiments might be going on...


The other room has had walls raised slightly to match the first room (and extended some of the exterior detail as well to cover the new wall), and again a door added. Again, the slant on the walls makes things tricky and this entrance had less available wall space to play with, so to make the removable door ended up with some very narrow strips of card to allow for the running grove - both doors should be the same size, but this one is a little tighter so has been sanded down on the edges a bit...


Much liquid g/s has helped hide any joins and blend stuff in. So far this is working quite well...

Wednesday, 28 May 2014

Action Force Tactical Battle Platform

 I picked this old Action Force playset up ages ago for about £8 if memory serves...


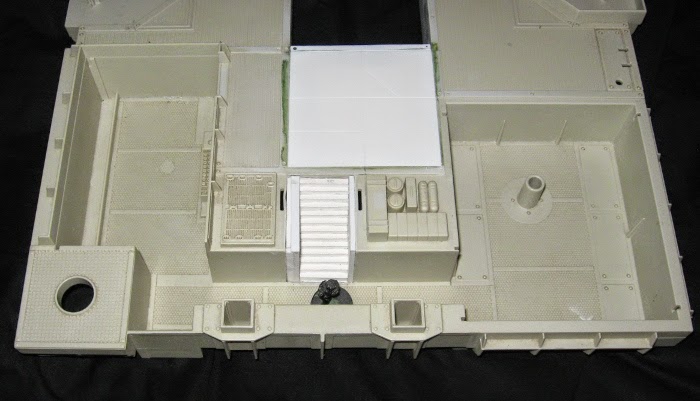
- it wasn't complete, the flip out platform was missing, as was the gun rack, but that was fine, as I originally intended to use it as an oil rig... but that has become too specific and the name of the game now is as much use as possible, so taking it down to the base platform gives a very interesting start to a 28mm terrain piece. There are some really great and crisp details and textures and I now see this as a good generic bit of sci-fi terrain for Dredd, Who, Blakes 7 and Action Force - it should work as a research centre, a pumping station, anything science based really (the legs will be used elsewhere I think)...


As you can see, I've removed the recessed vehicle pit and put in a platform - this helps give more area for 28mm figures and means they can cross from left to right without going down into the pit - my initial thought here was to reset the pit so it stuck out and to build more platform around it, however that would make it too big for storage so currently a wide flight of steps will go in the remaining hole. The filler platform has some plating etched into it and some random plates will be added elsewhere to help blend it in. The trench that runs along the back of the platform (joining the armoury with the control room) just happens to be perfect (with plenty of room) for 25mm slottas, so that was always staying, but in what form was a big question - originally I planned access down into the old armoury, and then along at the back to the old control room, but I suddenly decided to fill that blank space between two nicely molded gubbins, and cut down to add some steps there, and so far it looks pretty good I think.


The armoury (on the left) will now become a computer room, as 4 Ainsty computer panels fit nicely over where the rifle rack was. A door will be added to the bottom wall, but am undecided on whether to have a room above this. The control room (on the right, complete with attachment for a action figure sized chair) will become a machine room/engineering, with more hands on gubbins. The chair stalk will be kept I think and a door will be added blocking off the trench/corridor. Now the old control room had a black piece that fitted on for various consoles and this will make the basis of a next floor room, more machinery to monitor whatever is going on downstairs. Even better, on top of that fitted a clear plastic piece that form a lovely angled window on two sides and screams Spy-Fi villains office (but that is down the way a bit), so from that one area, I can easily make a 3 storey structure within the complex itself... plus I still have the hexagonal platforms and the helipad which scale much better to 28mm figures anyway...

Needless to say, this is going to take a while, the plastic is really hard to cut, but should make an interesting diversion...

Monday, 26 August 2013

Snatch Land Rover


A terrible picture, but not much to see anyway. I took advantage of the Model Zone liquidation sale and treated myself to the Airfix 1/48 Land Rover Patrol box set for £15. One of which of course, will (should) work perfectly alongside my very old (15 years plus) white metal Lanny. Of course, it's scaled correctly and as you can see from the picture, lines up frame wise quite nicely, but it's probably about 20 years older in design times. According to the bumpf it's been used since the 90's so I could fudge that into the mishmash of the UNIT timeline without too much trouble. I may pick up another set so I can have two armoured hard tops for the troops and the older soft top can be a command/scout vehicle. Ideally, I'd have got a Bedford 3-ton truck, but they go for a bomb as diecasts on eBay.


The second Lanny in the Airfix patrol kit is the WMIK, which is probably a bit too hardcore for fudging into the UNIT fluff as is. I may try and UNIT it yet, but somewhere in the back of my head I keep thinking it may work as a more realistic basis for the SAS Force Panther...


Monday, 8 April 2013

and March went where exactly?

OK, have fallen short there with March - so much for at least an update a month... but in my defence, I'm waiting for loads of stuff to arrive - I need some Judge helmets to finish my Urban Judges - waiting on an order from Wayland Games, waiting on some goodies from Ainsty to do some new buildings, need to sort out a church before I start on my graveyard as it will need to fit... I did dig out my Draconians though for some reason, the female noble is quite nicely done (ears are a bit iffy though) and I'm quite chuffed with the paper construct bodyguard... just need to get in a painting mood there...

Sunday, 21 October 2012

carry on camping

ok, just to explain that I haven't been completely idle for the last few weeks - although due to a couple of weeks required for cat sitting in November, can't guarantee how much will be happening next month... anyhoo, this little project has been bubbling away for a while and mainly involves the simply splendid APEX Investigators from Fenris... what those figures initially led me to, was a kind of field research team, useable for UNIT or even a SG-1 kind of set up... the main requirement was a main research tent and that took some working out... but I got there in the end...


all very army surplus and Time Team and I have two of them - it's essentially made from a basic frame of metal tubing which kept the basic cereal card cladding in place, additional tubing was added inside to represent the rest of the frame, thin wire was glued on the outside to match the inside upright tubes and then clad over in normal paper (did experiment with tissue paper but didn't work)... the roof is lift off, and is essentially a normal build for any kind of roof, but with tubing and paper cladding to give it some more shape and I reckon it works... the only stumbling block now is whether I try for a wooden sheet floor or plain grass - both appear equally common on photos of the real thing....

now, all the lab equipment inside needs power, so I needed a generator... this came from a handy sci-fi crate again from Fenris. I added some wire for the stand/handle thing, added a petrol cap with some tube and g/s and tweaked some of the detail to show as somekind of dial indicators, need to add some buttons still...


now the crate had no detail on one side from the casting, so I press moulded the grill pattern on one side with siligum and made a g/s copy on the otherside (sorry Ian)... it's not brilliant, does the job and may well get hidden a bit by a bush or something, but after the 2nd attempt, I was happy enough...


a bit big maybe, but for a chunky robust portable generator it does the job...


next was some flood lights, annoyingly this was the greatest time sink after the field tent, as I was happily press moulding the lights I'd made as and when I had a spare bit of g/s - but when I came to add them, I realised that design wouldn't look right - they are good, and will come in handy with the planned bunker as they look more like wall emergency lights I now realise... my second attempt has proved not very press mould friendly, so I need to rethink... but I have a few of these at least...


the final need for this little project were tents for the field workers themselves, so I cut a bit of bluefoam to shape, added wire for the supports and g/s'd it to get a nice smooth(ish) finish... a bit of detail was added for the access flap, seams and so on and tried to make it match one from Argos... there is a vent flap on the back, but it doesn't show up on the photo... all it really needs now is some cleaning up and adding the zip tab thingy... not sure how well that will press mould though as I would like a couple...


Friday, 1 June 2012

skirmish board

for a while now I'd had 4 2ft square foam terrain boards for a nice 4x4ft playing area... sadly following several downsize house moves, I no longer had the space other than the floor - however good luck finding a level surface with these floorboards, the square tiles tended to follow their own inclination and a 2x2ft playing area just didn't really cut it... so I flogged them and bought what appears to have been one of the last Mat-o-War green mats going.... only at 6x4ft it was more than I'd ever need... cue another moment of inspiration from Silent Invader over on LAF and his notice board table (which was reversable)

so with a cheap cork notice board from eBay I set to work... first off, the corner pieces were not solid (I said cheap right?), so they were filled in with g/s and smoothed flat so I had a nice consistant edge - this is going to be stored upright, so the metal edging was essential... the new corners were then painted Foundry black midtone which was a good match for the original plastic and then varnish to an inch of it's life... next came the scary bit... I had planned to cut the Mat-o-War so I had 4x4 as a loose mat and then 2x4 going spare, but this project gave me a use for the 2x4 - it was just the thought of cutting possibly the last mat going was a bit daunting... this could be an expensive screw up... so I chickened out and bought a cheap grassmat from eBay...


this was glued in place, only when I was pressing out any airbubbles, off came the grass (see cheap again), eventually I had a brown board with green patches... not good... so back to plan B and I stripped the cheap paper mat off and cut the expensive Mat-o-War up... once commited it went on quick enough, but again I had a couple of bubbles in the mat despite my best efforts - however the sturdiness of the mat came into it's own as I was able to slice the bubble, insert more glue and press it closed with no sign of the cuts and no sign of the bubble... this was working fine until I had a glue accident and the top surface got a few splodges of UHU which, despite clean up, managed to still leave some dark spots when dry... but a cunning plan occured and with some scenic spray cement I added some static grass - with a very dodgy nozzle, this was more random than I planned and so there is more on there than needed, but it helps give some more colour and texture to the grass and helps match up with the terrain I have... this was kind of at the back of my mind, as I had thought about the exposed earth areas on my terrain and I didn't really fancy doing that to the mat...


so, there it is... a handy skirmish board, a little under 3x2 feet that can sit nicely and flat either on the floor or on my small painting table (when it's clear)... it should be big enough for the small games I have in mind for either Folk Horror or Doctor Who, although some distances may need to be shortened... I just need to finish more scenery - the three river bank sections fit nicely along the long side and by removing the dock area, the two sections fit on the short side... I have some dirt tracks in mind (again nicked from Silent Invader) and this has led me to think about a bridge section as well... we'll see...

oh, and I kept the cork board on the other side - I plan to use that for urban/industrial terrain...

Wednesday, 30 November 2011

+++INPUT+++MECHANOIDS+++INPUT+++

some classic Who Mechanoids...

from an admittedly not so random question now I think about it to a 3D print to this, now available from Ainsty as the Mechanot... and it's the same shiny silver problem I had with the Giant Robot, shading and super shiny are beyond me so they have more of a lived in air to them...

I've change a bit from the Ainsty model/original design (which has three sensors in a triangular pattern) - I want to do some identifiers on the front panel, so filled that in with g/s - need to work on those decals at some point... another divergence is the area below the antenna... I did toy with paint in the white balls (or could have done some conversion work to add them in), but decided to inject even the slightest bit of colour in there so tried for a pale blue glow to suggest a power source within...

have also left the bases for now, as I'm entertaining ideas on doing a space station build again... so they could be deck plate or they could be dirt/gravel and grass...

so, pending decals and deciding on the base, done for now...

Friday, 4 November 2011

introducing the Mechanot...

remember this fella?


now in resin with some lovely brasswork...


I have to say, it looks great, the brasswork has really brought this up to another level... even if I do say so myself ...

I should be getting hold of some shortly, so painted versions to follow, but it's available from Ainsty now.

Sunday, 21 August 2011

a minor disaster

I've been bubbling away in the background with my Draconians, expanding the retinue... however as over the several attempts over the years to get a good colour for the ones I'd started, I figured I strip them all down... a month and a bit in the dettol and the paint has fallen away lovely... unfortunately so has the greenstuff on the conversion I did for the Draconian prince...


2008 that was... not the end of the world really, as I can redo the robes to better fit the new theme, but I really do need to pull my finger out... especially after having listened to Paper Cuts...


Sunday, 26 June 2011

the 'what every good Doctor Who story needs' project intermission

ok... so this stalled a wee bit... when I came to start undercoating, I completely fell out of love with the rock finish... it was all too rounded and worn, I wanted something a little more jagged - sheared rockfaces with tiny crevices and handholds... I came to realise I really wanted sharp edges and the whole thing stalled...

now I'd been giving it some thought lately, checking out various techniques online for wargaming and railroad set ups... bearing in mind I'll be building up on my existing structure, I needed a 'cladding' finish... bark bits are popular, but I couldn't see them working with what I had... recutting the foam wasn't winning me over... railroaders use the wet plaster in crinkled foil method (google is your friend), but would be too heavy and thick... however, I came up with a variation on that...

crinkled craft tissue paper... for the test piece I cut a thin strip, scrunched it up into a ball and then pulled it out into a strip again, without flattening it... slapped on some PVA and put on the strip, allowing the crinkles to stay and even creasing them some more... dry and a quick pj and I'm quite happy with that...

bearing in mind, there will also be the vertical definitions in the bluefoam that are absent here... should be good...

a Rescue to a Chase

more companions... Ian, Barbara and Vicki...

I'm slowly working through my companions... with exception of Dodo, because let's face it, what use was she? Susan should have been part of this group, but I had to cut her head off on account of it being a really, really, really ugly head... no paint job could have solved that one, so off it came and I'm halfway through replacing it...

and a shape of something to come...

watch this space, just don't hold your breath... it's going to take a while...

Thursday, 3 February 2011

more knobrot iDaleks...

I can't imagine anyone following this doesn't already know about these... but this weeks Doctor Who Adventures magazine has yet more iDalek figures as a freebie.... 17 of the buggers this time, as opposed to 5 previously...

you get 5 orange (although a strange orange) Scientists, 5 red Drones, 1 white Supreme, 1 yellow Eternal and 5 blue Strategists (the Supreme and Eternal being unique amongst Daleks)... as you can see there are some gaps, so like before will need popping apart and realigning, but that shouldn't be a problem...

and of course, they are a perfect match again, the older release (orange again, just not a strange orange) has a rounder dome which matches the prop better, the new releases have a lower tommy helmet shaped dome which is odd as otherwise the models are identical... the new release also seems to have slightly crisper detail as well... not sure why the dome change, perhaps it signals a slight redesign for the 2012 series and they are getting in the change early... dunno...

oh and while I remember, they are too big for 25mm slottas... as they were before and should be with that massive bumper... you can however get 30mm slottas from EM4 which do the job nicely...

next weeks issue is Cybermen and Sontarans, but they look crap...